In the previous post, we secured our GitOps workflow using GitHub. Now it’s time to take our next major step: automating builds with Cloud Build, the heart of our CI/CD pipeline on Google Cloud Platform (GCP).
Build pipelines are where we transform code into deployable artifacts—and where we have our best opportunity to enforce security policies early. In this post, we’ll zconfigure a secure Cloud Build workflow for our sample app and integrate essential security checks like SAST, container scanning, and secret handling.
1. What is Cloud Build?
Cloud Build is GCP’s fully managed CI/CD service. It allows developers to define and run build steps in secure, isolated environments triggered by GitHub events like pull requests or merges.
Key DevSecOps Benefits:
Serverless, immutable build infrastructure.
Strong IAM-based access controls.
Native integration with GitHub, Artifact Registry, and Secret Manager.
Detailed audit logs and build provenance.
2. Practical Setup: Building Securely with Cloud Build
To help you get everything working end-to-end, here’s how to set up a production-ready build pipeline for the OpsGo sample app.
🔧 One-Time GCP Setup
⚠️ Security Tip for Open Source Repositories If your GitHub repository is public, anyone can submit a pull request—which will trigger a Cloud Build unless additional controls are added. To prevent abuse of compute resources or exfiltration via malicious PRs:
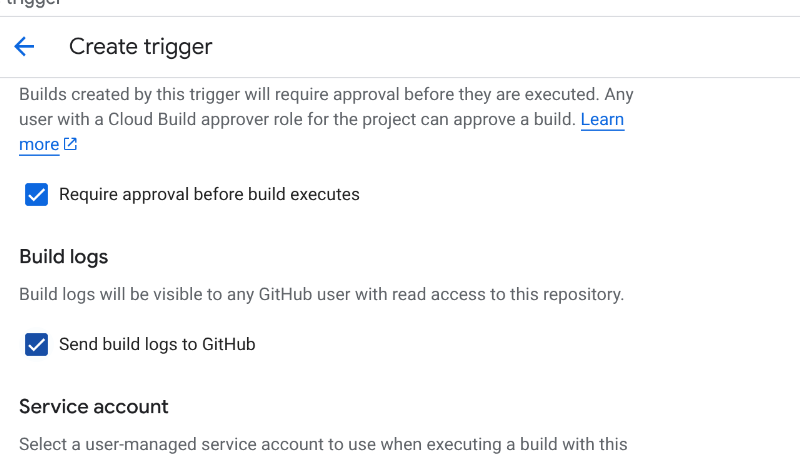
✅ Enable manual approvals for build triggers. This allows a trusted maintainer to inspect the PR before allowing the build to proceed. 🔒 On private repositories with restricted contributors, this risk is much lower, but it’s still good practice for sensitive environments.
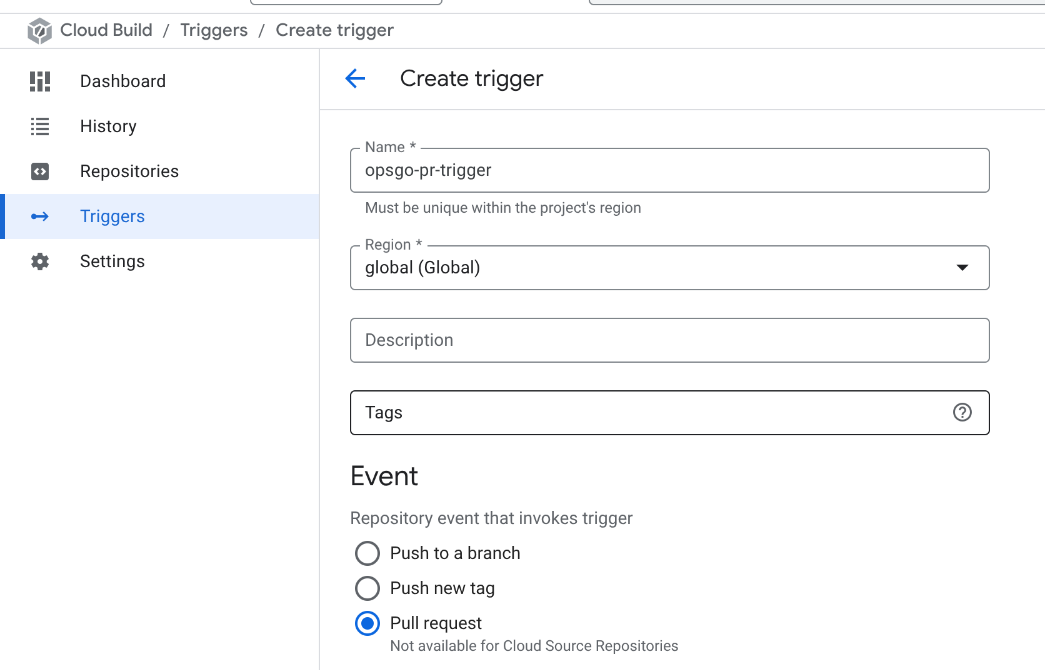
You can enable approvals when configuring the trigger under "Pull request" > Require approval. For full documentation, see Manual Approvals in Cloud Build.
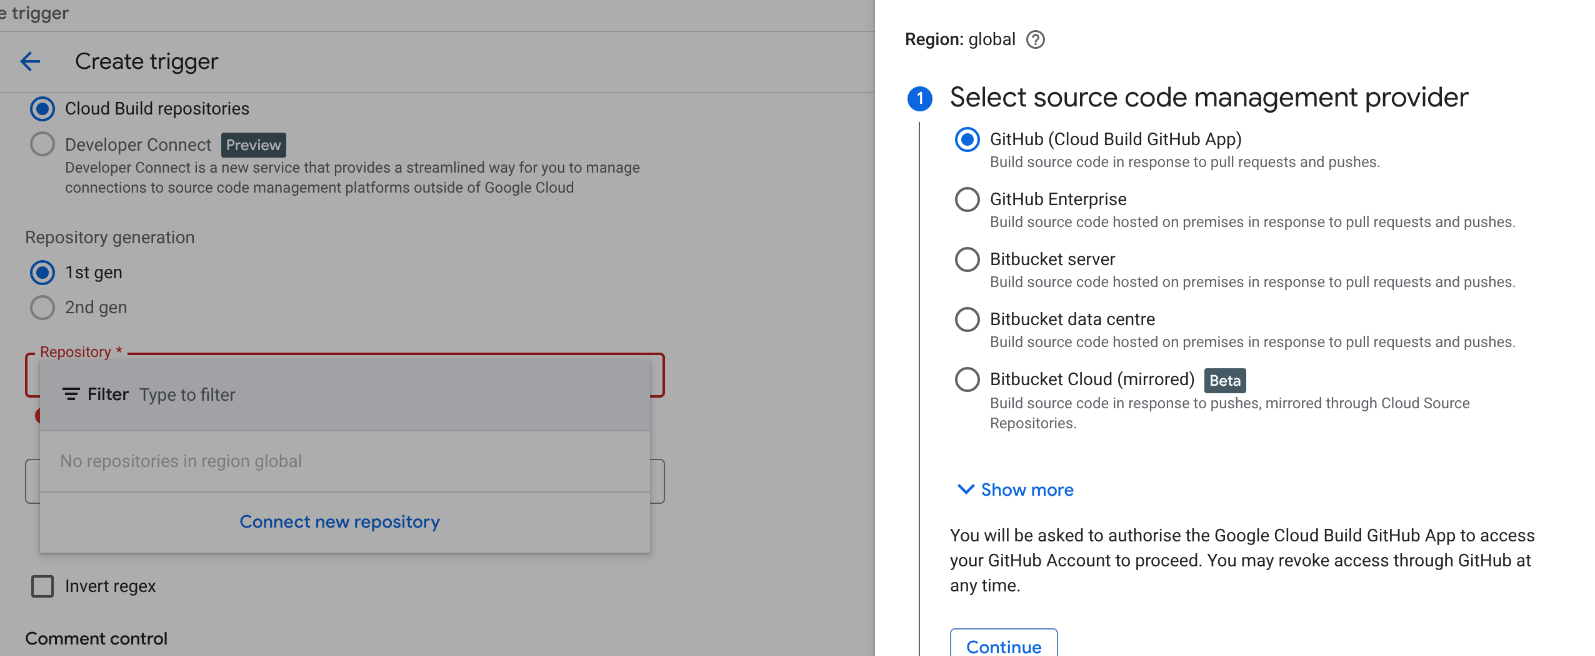
Click Connect Repository and install the GitHub App
Create a trigger on pull requests targeting the main branch and enable build approvals
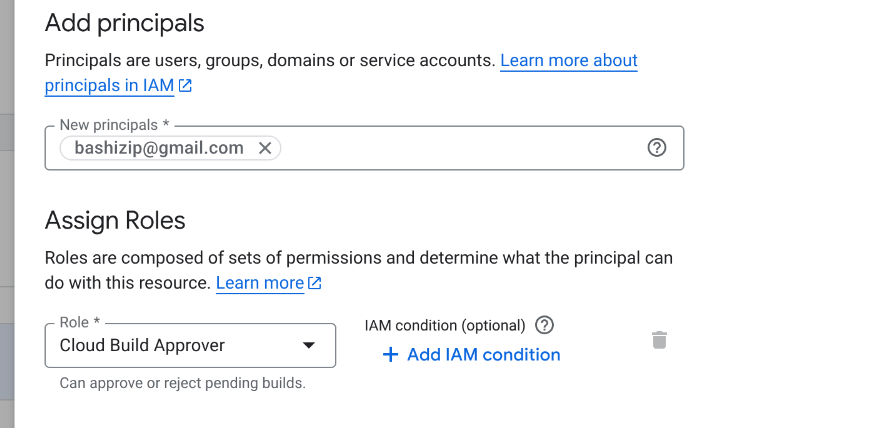
Note that you need to add at least one IAM with the correct role.
3. Setting Up SonarQube for Static Analysis
Before we can scan our code with SonarQube in Cloud Build, we need to host a SonarQube instance. Here’s how to do it quickly using GCP-native infrastructure:
Option 1: Run SonarQube on GCE (Recommended for Simplicity)
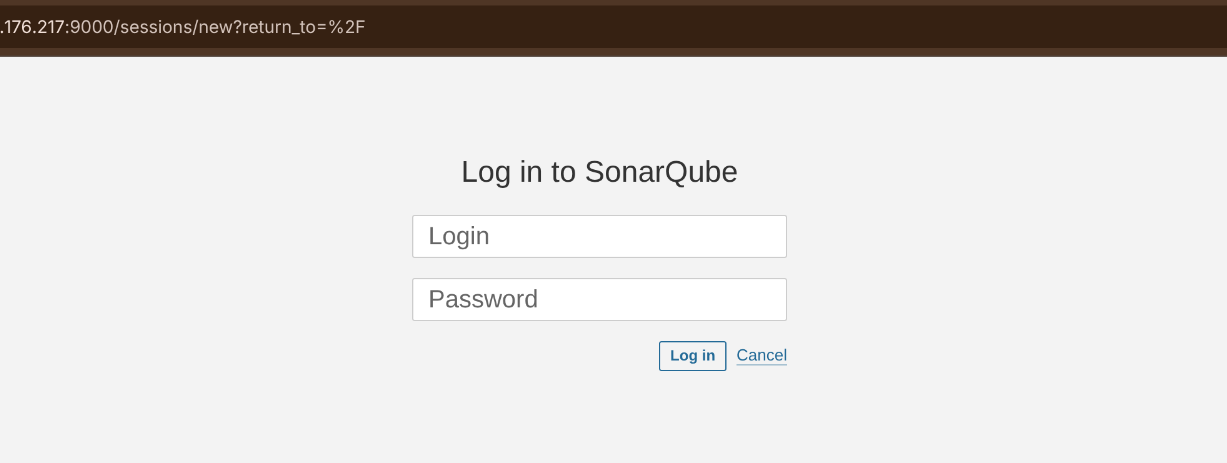
Access your instance via http://<external-ip>:9000 and log in as admin/admin.
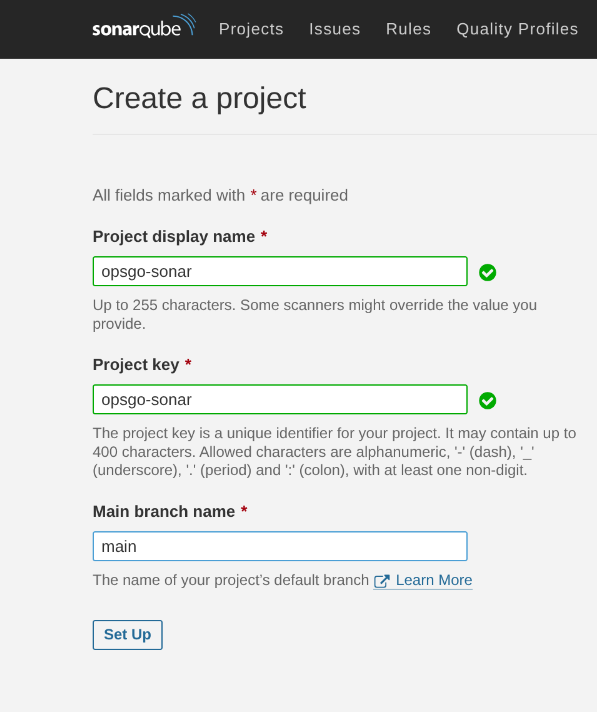
Create a project and generate a token to use in the scanner.
💡 You do not need to connect GitHub to SonarQube. Instead, choose "Other CI" during project creation and generate a token. This method is ideal for use in Cloud Build pipelines and works seamlessly with our GitHub-based workflow.
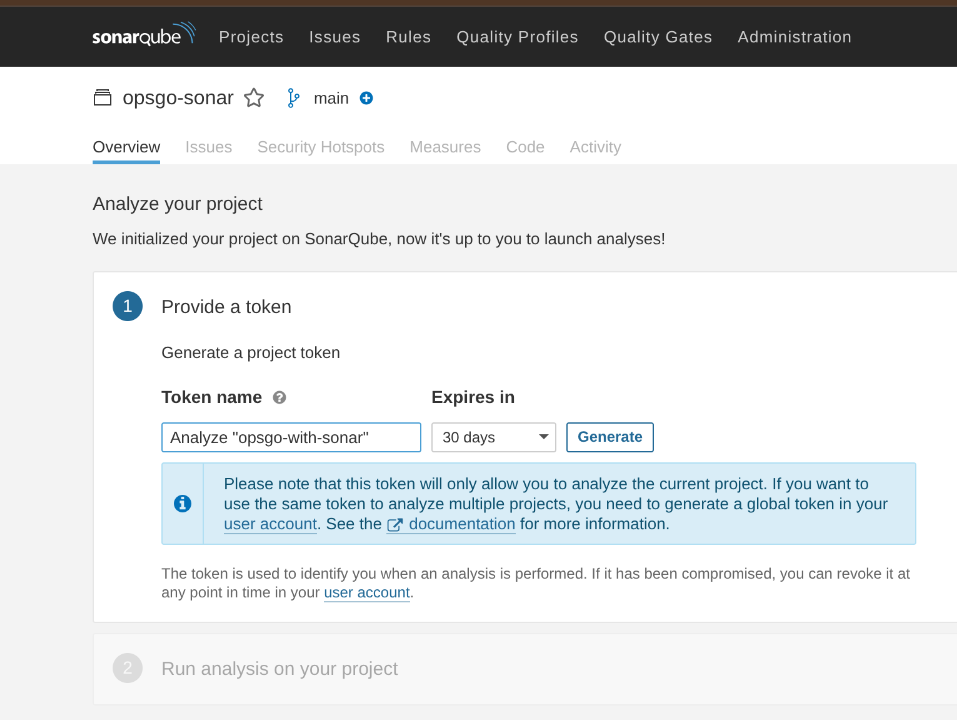
🔑 Generating a Token in SonarQube
After creating your project in SonarQube using the "With Jenkins or other CI" option, you’ll be prompted to generate a token for authentication.
This token allows your Cloud Build pipeline to authenticate and push scan results to SonarQube without needing a user session. Choose a clear name (e.g., opsgo-with-sonar) and an appropriate expiration period (e.g., 30 days or more for CI/CD use). Once generated, copy the token and store it securely—such as in Secret Manager on GCP.
⚠️ This token is project-scoped, meaning it only works for the specific project it was created under. For multiple projects or shared usage, generate a global token from your user account.
This step is essential to integrate static analysis securely into your build pipeline.
🔐 Store the Token in Secret Manager
Once you've generated the token, store it in Secret Manager using the following command:
🧠 Replace 'your-sonar-token' with the actual value you copied from the SonarQube UI.
Now, the token can be securely injected into your Cloud Build pipeline using availableSecrets.
Option 2: Deploy SonarQube to GKE (Scalable)
Use Helm charts or Kustomize with persistent volumes and Ingress for teams needing HA.
4. Writing a Secure cloudbuild.yaml
Place the following file at the root of the OpsGo repo: (or replace the existing one)
# Cloud Build configuration to build a Go application and run a SonarQube scan.

options:
  # Configure logging for the build.
  # CLOUD_LOGGING_ONLY sends logs exclusively to Cloud Logging,
  # useful for centralized log management.
  logging: CLOUD_LOGGING_ONLY

steps:
  # Step 1: Build the Go application
  # Uses the official ( but old version by purpose ) Golang Docker image to manage dependencies and compile the binary.
  - name: 'golang:1.19'
    entrypoint: 'sh'
    args:
      # 'go mod tidy' ensures module dependencies are consistent.
      # 'go build -o opsgo' compiles the Go application into an executable named 'opsgo'.
      - '-c'
      - 'go mod tidy && go build -o opsgo'
    id: 'build-go-app' # A unique identifier for this step, helpful for dependencies.

   # Step 2.1: Run SonarQube analysis
   # Create the sonar dir before the SonarQube scan
  - name: 'alpine'
    entrypoint: 'sh'
    args:
      - '-c'
      - 'mkdir -p .sonar && chmod 777 .sonar'
    id: 'prepare-sonar-dir'

  # Step 2.2: Run SonarQube analysis
  # Uses the SonarScanner CLI Docker image to perform code analysis.
  - name: 'docker.io/sonarsource/sonar-scanner-cli'
    entrypoint: 'sonar-scanner'
    args:
      # Define the SonarQube project key.
      - '-Dsonar.projectKey=opsgo-sonar'
      # Specify the source directory for analysis (current directory).
      - '-Dsonar.sources=.'
       # Set the working directory for SonarQube
      - '-Dsonar.working.directory=.sonar'
      # Provide the URL of your SonarQube server.
      - '-Dsonar.host.url=http://{SONAR_IP}:9000'
      # Pass the SonarQube authentication token.sqp_72f20ad3a3c4cf0b07cbdcd4bb44ec50b4f63677
      # '$SONAR_TOKEN' is automatically populated from the availableSecret.
      - '-Dsonar.token=$$SONAR_TOKEN'
    secretEnv: ['SONAR_TOKEN']
    id: 'run-sonar-scan' # A unique identifier for this step.

availableSecrets:
  # Define secrets to be made available during the build process.
  # These secrets are securely fetched from Google Secret Manager.
  secretManager:
      # Specifies the full resource path to the secret version in Secret Manager.
      # Cloud Build will fetch the 'latest' version of the 'SONAR_TOKEN' secret
      # from the specified project.
    - versionName: projects/$PROJECT_ID/secrets/SONAR_TOKEN/versions/latest
      # Exposes the secret's value as an environment variable named 'SONAR_TOKEN'
      # to all subsequent build steps. This allows the sonar-scanner step to use it directly.
      env: 'SONAR_TOKEN'
🧠 Step-by-Step
➡️ Compile Go code ➡️ Run SonarQube scan ➡️ Secrets injected via Secret Manager
⚠️ Important: Referencing Secrets in Cloud Build
When using secretEnv to inject secrets like SONAR_TOKEN, you must use double dollar signs ($$SONAR_TOKEN) when referencing them in args.
This tells Cloud Build to pass the variable to the runtime shell, instead of treating it as a substitution at build parse time.
🧪 Verifying Your First Secure Build with SonarQube
Let’s walk through the exact process of validating your SonarQube integration before adding Trivy or pushing containers. This step-by-step guide mirrors what a real first run should look like.
1. 🟢 Push Changes to dev
Make a change in your local dev branch and push it:
git add .
git commit -m "Add SonarQube for SAST"
git push origin dev
GitHub will detect this push and offer to open a pull request.
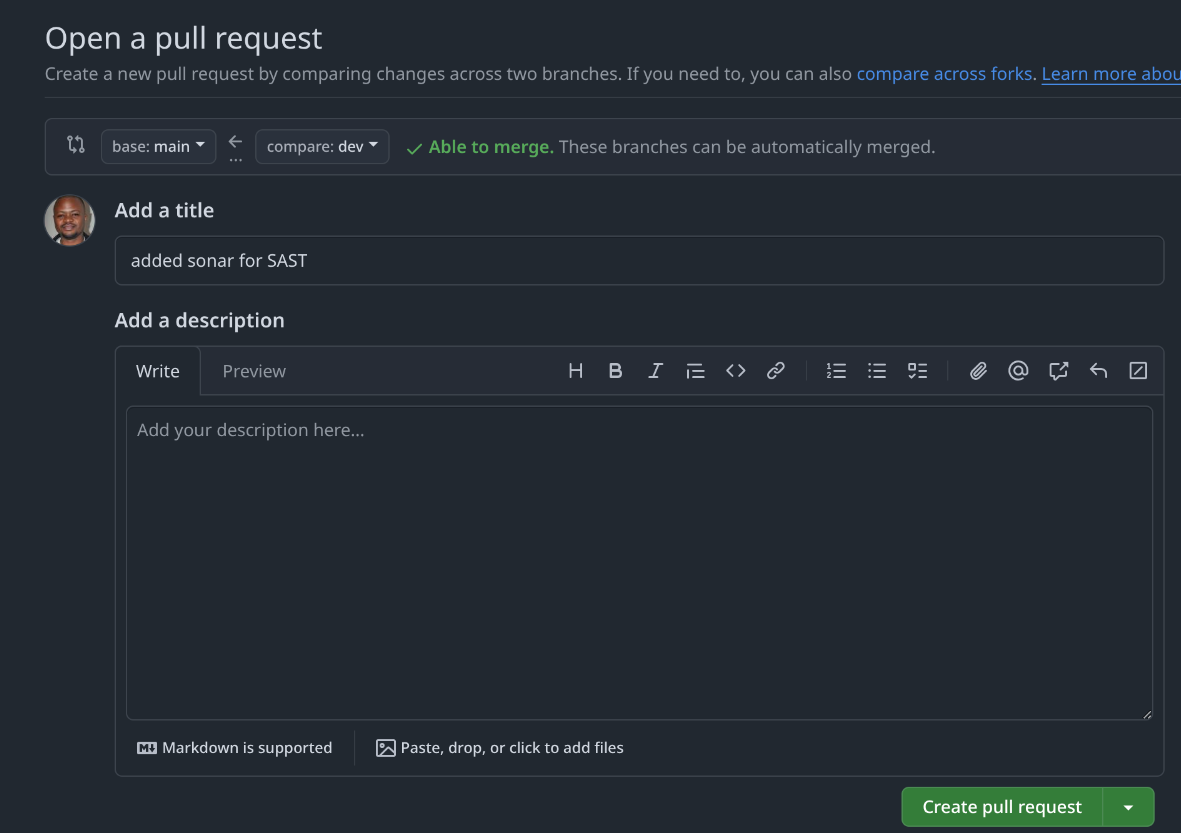
2. 🔀 Create a Pull Request
Click Compare & pull request, select base: main, compare: dev, and open a pull request.
The PR targets the protected main branch.
Your Cloud Build trigger is configured to activate on pull requests to main.
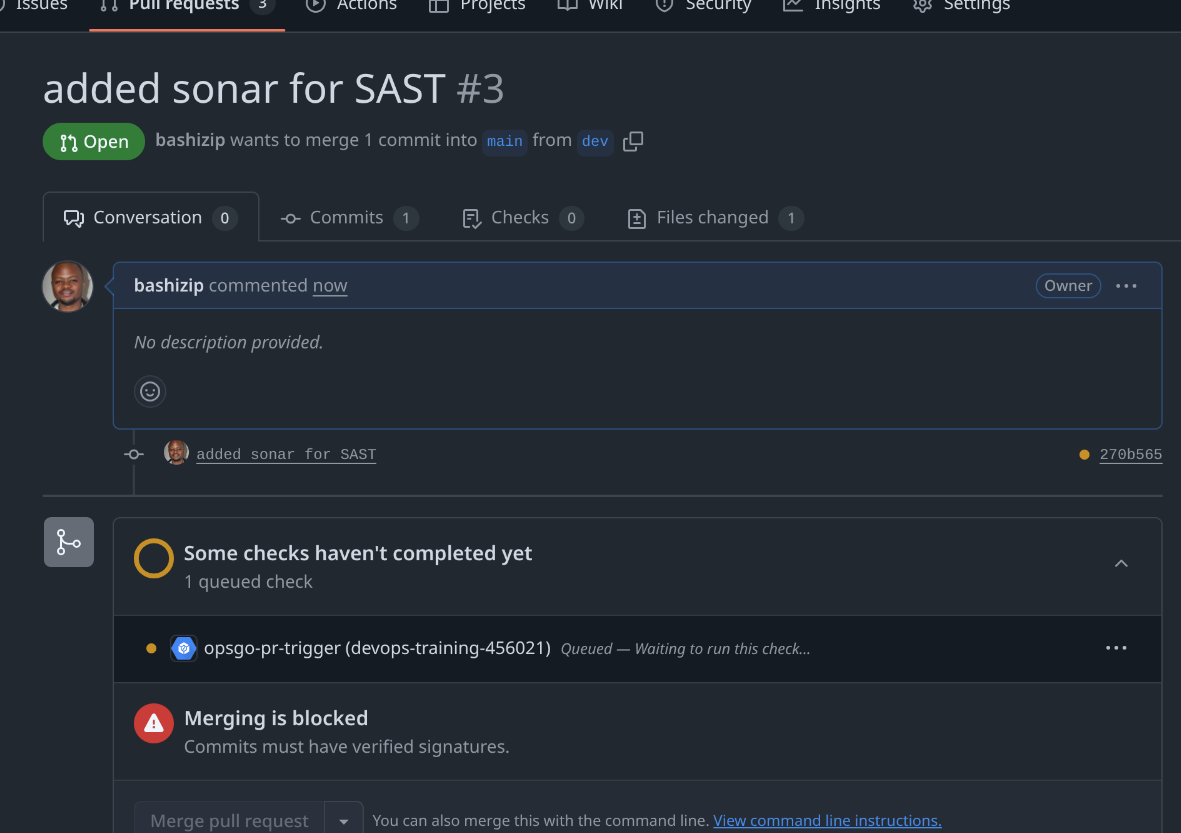
3. 🚧 Build Awaits Approval
The build appears in Google Cloud Build with the status: Awaiting approval
This happens because you’ve enabled manual approvals on the trigger (a best practice for open source). The GitHub Checks tab will also reflect the pending build.
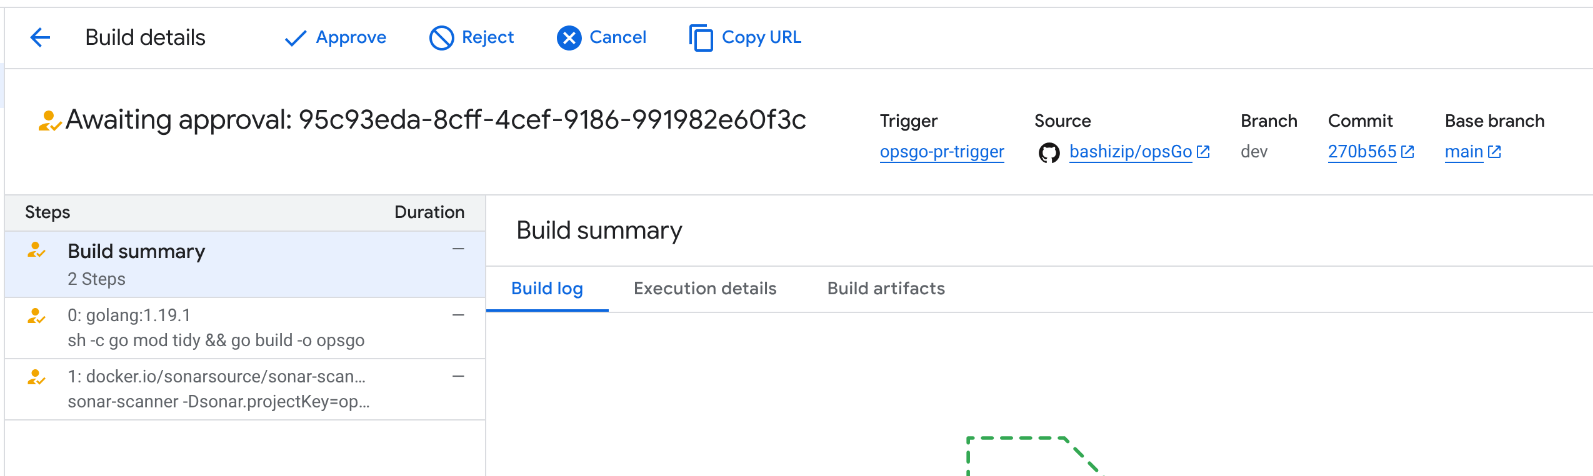
4. ✅ Approve the Build in GCP
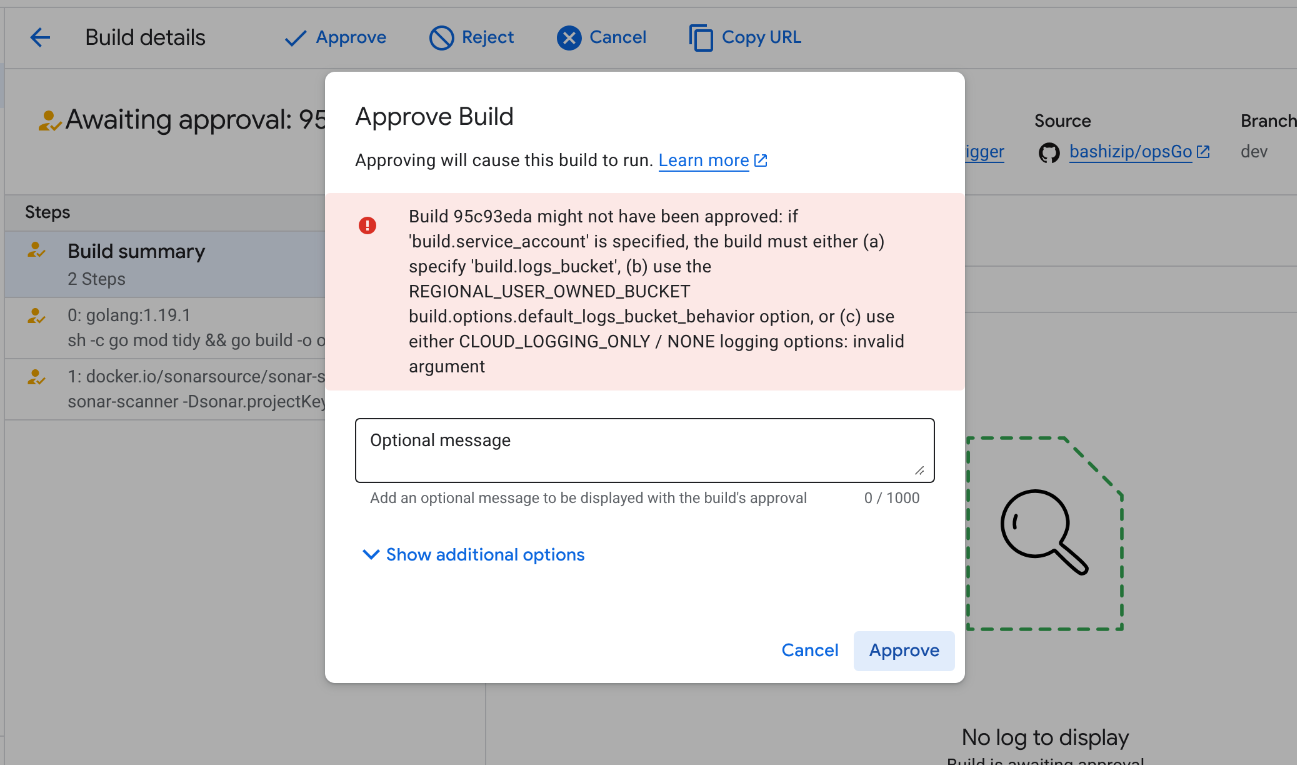
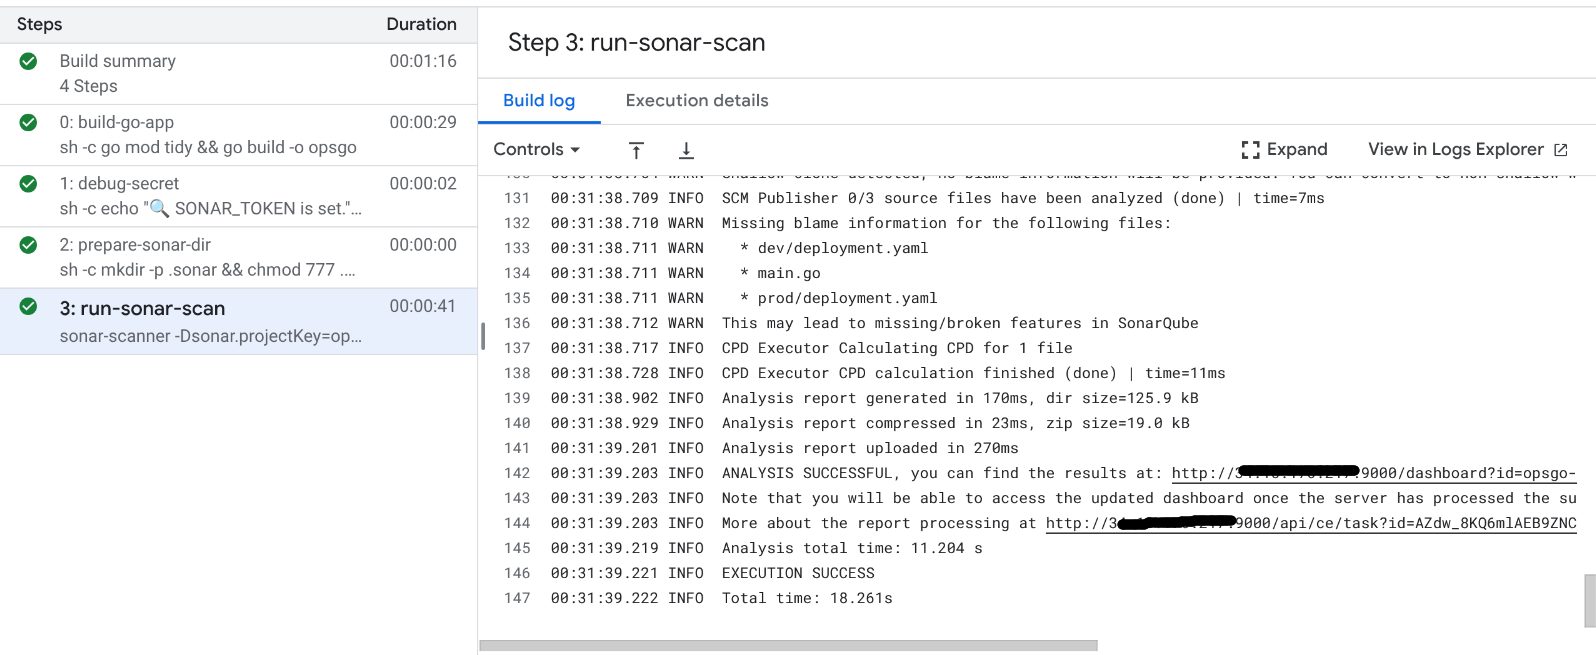
Go to Cloud Build > History Click on the pending build, then click Approve.
If you see an error about logging buckets, make sure to specify the correct build.logs_bucket or use CLOUD_LOGGING_ONLY as the log option.
Once approved, Cloud Build will:
Compile the Go app.
Run the SonarQube scanner.
Upload results to your SonarQube dashboard.
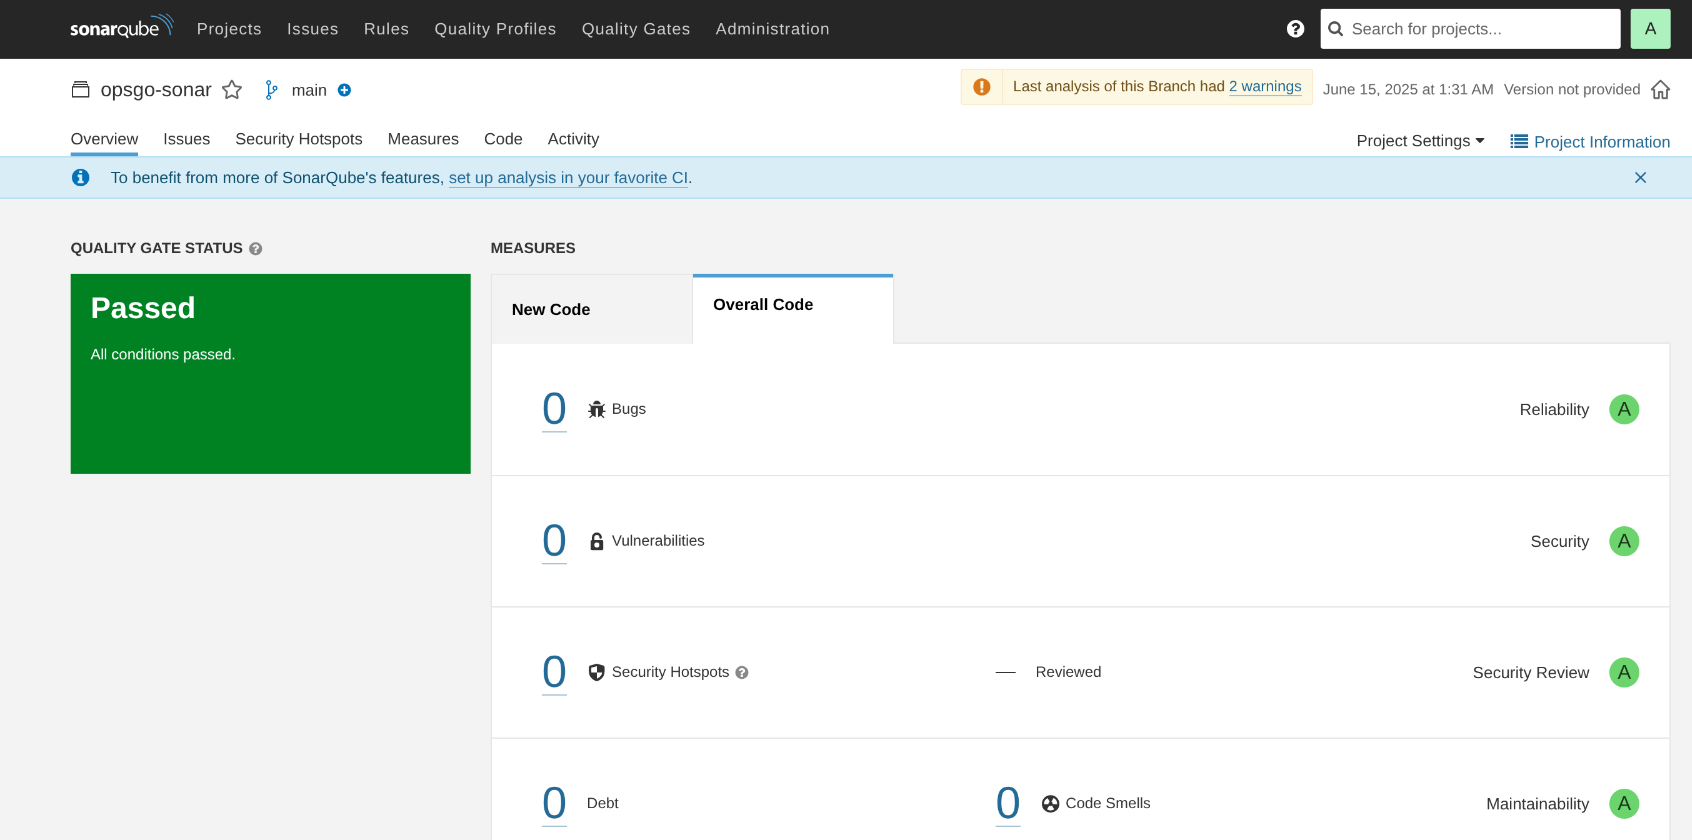
📊 Interpreting the SonarQube Analysis Results
Once the scan completes, SonarQube provides a comprehensive dashboard displaying key quality and security metrics. In our case, the analysis returned a "Passed" quality gate with no issues detected, meaning the code meets all preconfigured quality and security thresholds.
✅ Highlights from the Results
0 Bugs: No logical errors or broken flows were detected.
0 Vulnerabilities: No insecure code patterns that could be exploited.
0 Security Hotspots: No areas flagged for deeper security review.
0 Code Smells: The code is clean, idiomatic, and maintainable.
Reliability, Security, and Maintainability Grades: All scored A, the highest possible rating.
This “all green” result is expected, as our sample app is intentionally minimal. OpsGo is a lightweight Go application designed to help us demonstrate pipeline security—not to test complex business logic or legacy code.
🔒 No secrets exposed At no point in the scan did we expose secrets, tokens, or credentials in the codebase. This validates that our secret management and Git hygiene practices are effective, and our SONAR_TOKEN was injected securely via Secret Manager — never hardcoded or committed.
SonarQube also provides:
An execution trace with timestamps (submittedAt, startedAt, executedAt)
A direct link to the full project dashboard and quality gate history
Optional integration APIs to surface these insights in CI/CD or GitHub checks
🔍 Note: “Missing blame information” warnings appear because the scanner couldn’t associate commits to specific authors (e.g., shallow clone or lack of git history). This doesn’t impact analysis but can be fixed later by scanning in full Git context.
Triggering a Failing SonarQube Scan (On Purpose)
Now that we’ve seen how a clean project passes all quality gates, let’s simulate a common real-world case: introducing issues that cause the scan to fail. This helps validate that our pipeline and SonarQube setup actually catch problems before deployment.
To demonstrate the power of your security scans, it’s important to simulate a real-world issue that causes the SonarQube quality gate to fail, but still lets the build complete successfully.
🔐 Example: Hardcoded Secret
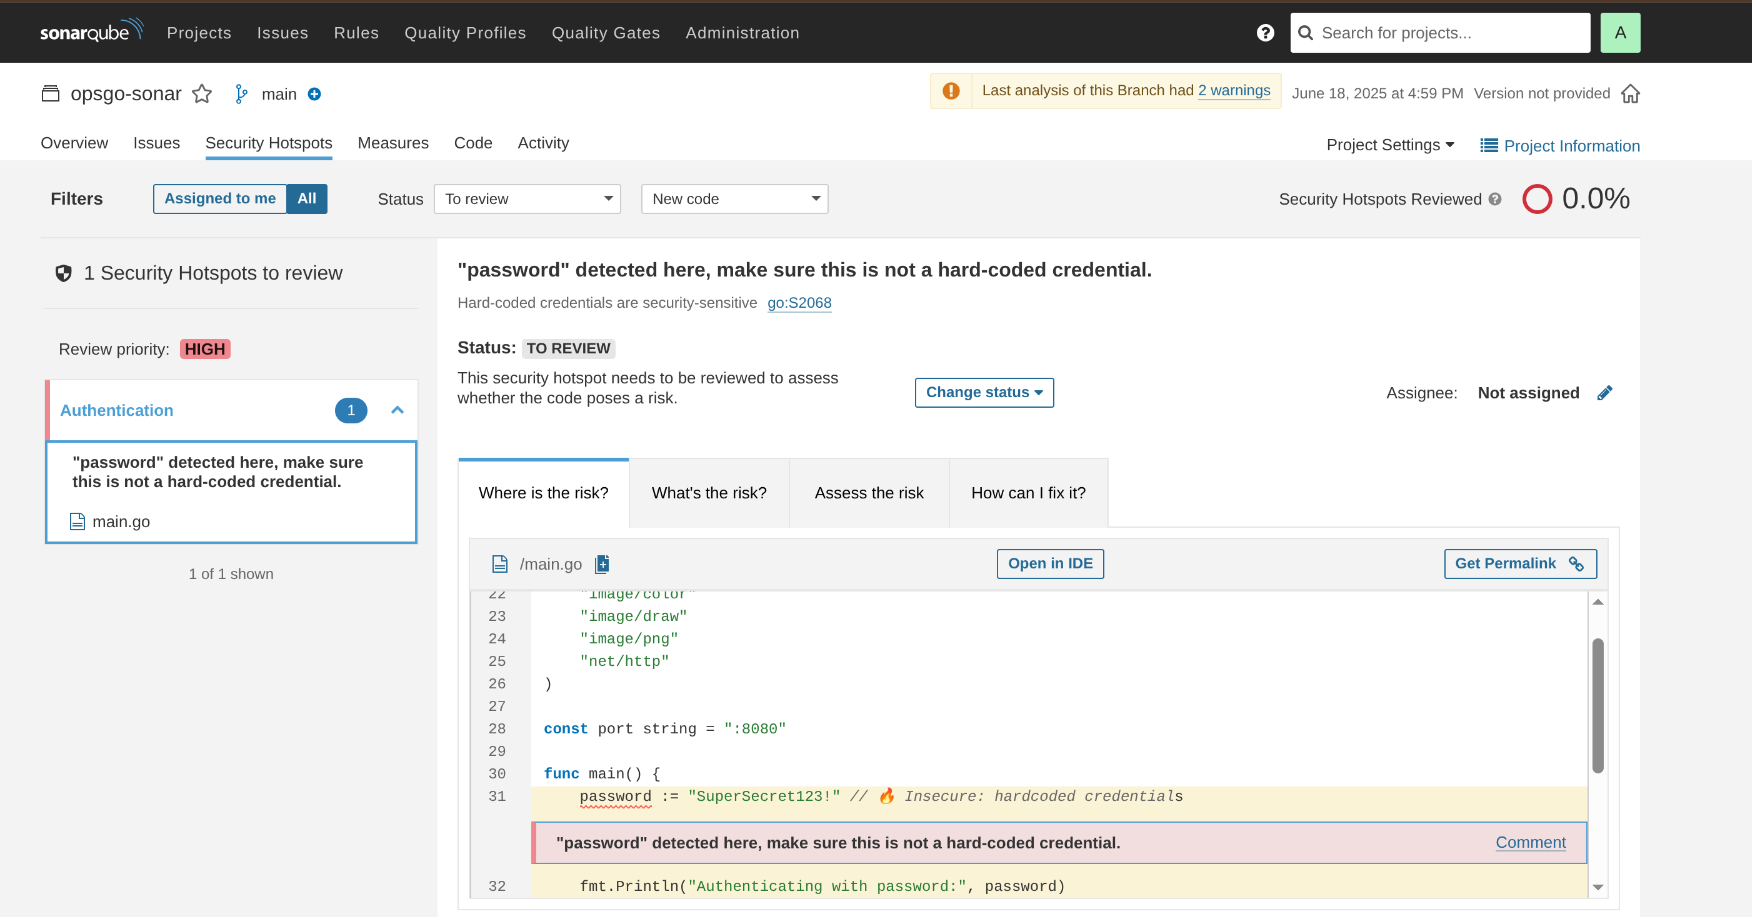
Let’s introduce an insecure pattern—a hardcoded password:
package main

import "fmt"

func main() {
	password := "SuperSecret123!" // 🔥 Insecure: hardcoded credentials
	fmt.Println("Authenticating with password:", password)

	http.HandleFunc("/blue", blueHandler)
	fmt.Println("Listening on port " + port)
	http.ListenAndServe(port, nil)
}
Commit this to your dev branch and open a pull request. Cloud Build will trigger the scan as usual.
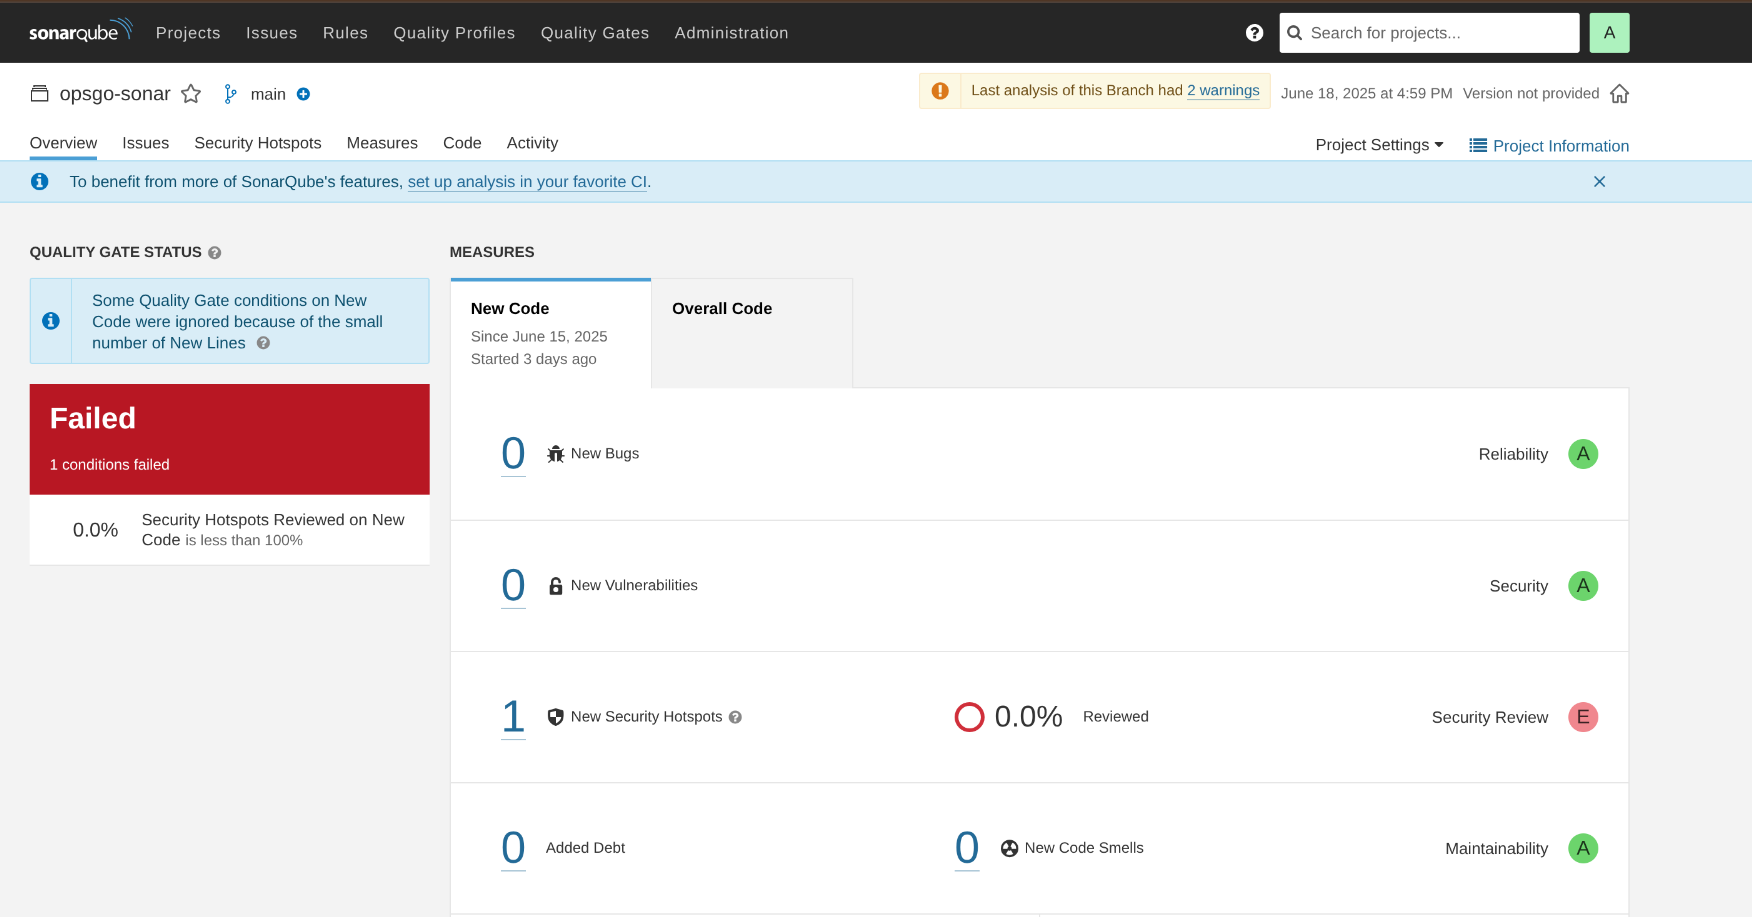
What Happens in SonarQube
After scanning:
The issue will show under Security Hotspots or Vulnerabilities
If your quality gate is configured to fail on critical findings, the gate will fail
Your Cloud Build pipeline still succeeds, but the SonarQube dashboard turns red
This example is syntactically valid in most languages (Java, Python, etc.), so it compiles successfully and lets the scanner do its job. But in Go, even minor issues like unused variables or unreachable code can break the build before the scan happens.
🧠 This strictness is actually a strength: Go pushes security and quality checks further left than most languages, enforcing clean, production-ready code at compile time. While this can make testing scan failures trickier, it aligns perfectly with DevSecOps principles.
🔍 Optional: Make It More Obvious
You can strengthen the failure by:
Adding a code smells
Calling unsafe system functions
Reducing the quality gate tolerance (e.g., fail on any new issue)
⛔ Enforcing SonarQube Quality Gate Results
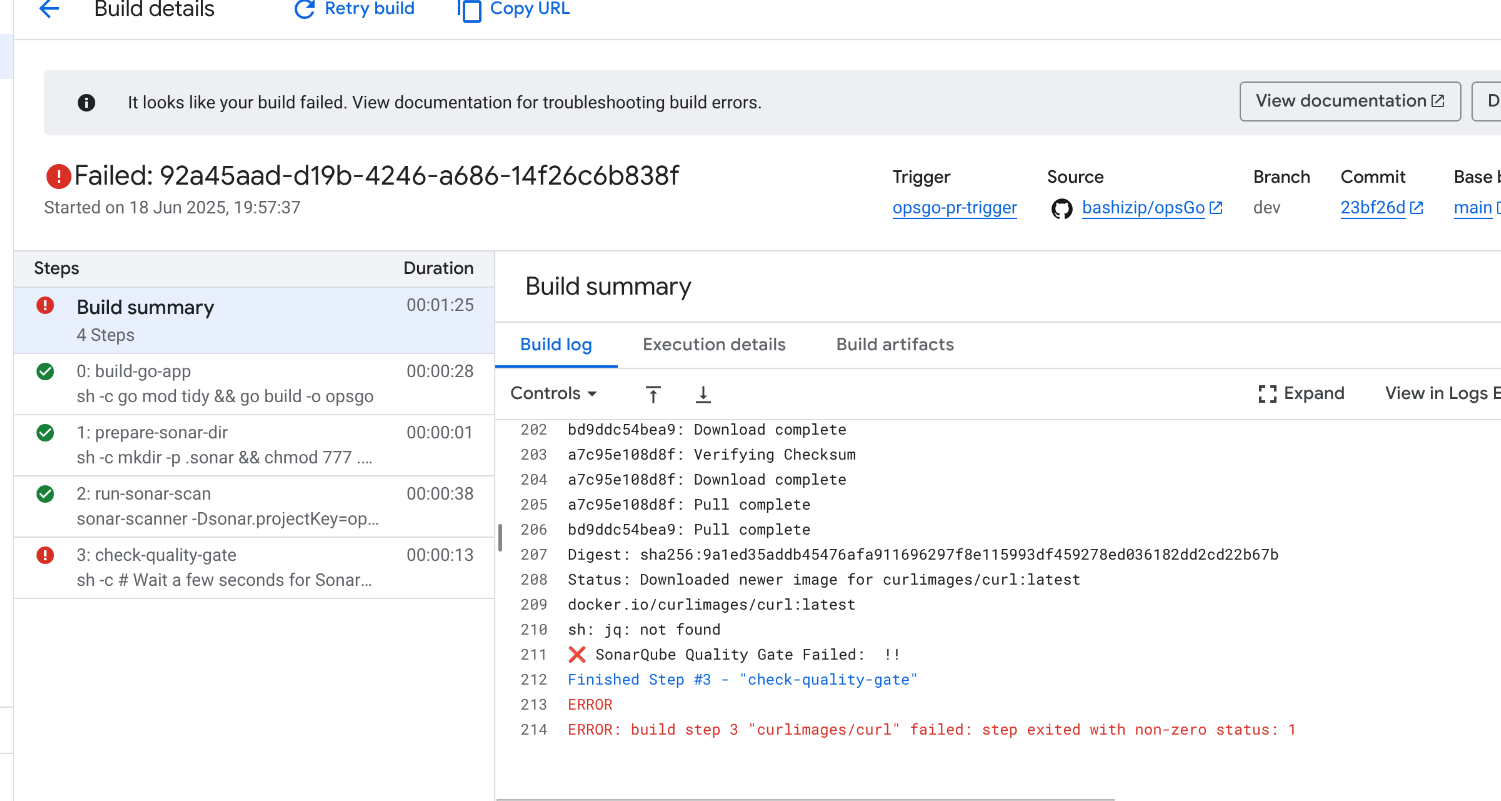
By default, SonarQube scans report results to the dashboard but don’t fail the Cloud Build pipeline, even when serious issues are found. To enforce quality gates and prevent vulnerable or low-quality code from proceeding, we can add a final check step.
Here’s how:
# Cloud Build configuration to build a Go application and run a SonarQube scan.

options:
  # Configure logging for the build.
  # CLOUD_LOGGING_ONLY sends logs exclusively to Cloud Logging,
  # useful for centralized log management.
  logging: CLOUD_LOGGING_ONLY

steps:
  # Step 1: Build the Go application
  # Uses the official (but old version by purpose) Golang Docker image to manage dependencies and compile the binary.
  - name: 'golang:1.19'
    entrypoint: 'sh'
    args:
      # 'go mod tidy' ensures module dependencies are consistent.
      # 'go build -o opsgo' compiles the Go application into an executable named 'opsgo'.
      - '-c'
      - 'go mod tidy && go build -o opsgo'
    id: 'build-go-app' # A unique identifier for this step, helpful for dependencies.

  # Step 2.1: Prepare SonarQube working directory
  # Creates the .sonar directory with proper permissions before running the scan.
  - name: 'alpine'
    entrypoint: 'sh'
    args:
      - '-c'
      - 'mkdir -p .sonar && chmod 777 .sonar'
    id: 'prepare-sonar-dir'

  # Step 2.2: Run SonarQube analysis
  # Uses the SonarScanner CLI Docker image to perform code analysis.
  - name: 'docker.io/sonarsource/sonar-scanner-cli'
    entrypoint: 'sonar-scanner'
    args:
      # Define the SonarQube project key.
      - '-Dsonar.projectKey=opsgo-sonar'
      # Specify the source directory for analysis (current directory).
      - '-Dsonar.sources=.'
      # Set the working directory for SonarQube (where temp files are stored).
      - '-Dsonar.working.directory=.sonar'
      # Provide the URL of your SonarQube server.
      - '-Dsonar.host.url=http://<SONAR_IP>:9000'
      # Pass the SonarQube authentication token.
      # '$$SONAR_TOKEN' is automatically populated from the availableSecret.
      - '-Dsonar.token=$$SONAR_TOKEN'
    secretEnv: ['SONAR_TOKEN']
    id: 'run-sonar-scan' # A unique identifier for this step.

  # Step 2.3: Verify SonarQube Quality Gate Status
  # Checks if the SonarQube quality gate passed (fails build if not).
  - name: 'curlimages/curl'
    entrypoint: 'sh'
    args:
      - '-c'
      - |
        # Wait a few seconds for SonarQube to process the analysis.
        sleep 10
        # Fetch the quality gate status using the SonarQube API.
        RESULT=$(curl -s -u "$$SONAR_TOKEN:" "http://SONAR-IP9000/api/qualitygates/project_status?projectKey=opsgo-sonar" | jq -r '.projectStatus.status')
        # Fail the build if the quality gate status is not "OK".
        if [ "$$RESULT" != "OK" ]; then
          echo "❌ SonarQube Quality Gate Failed: $$RESULT !!"
          exit 1
        else
          echo "✅ SonarQube Quality Gate Passed !"
        fi
    secretEnv: ['SONAR_TOKEN']
    id: 'check-quality-gate'

availableSecrets:
  # Define secrets to be made available during the build process.
  # These secrets are securely fetched from Google Secret Manager.
  secretManager:
    # Specifies the full resource path to the secret version in Secret Manager.
    # Cloud Build will fetch the 'latest' version of the 'SONAR_TOKEN' secret
    # from the specified project.
    - versionName: projects/$PROJECT_ID/secrets/SONAR_TOKEN/versions/latest
      # Exposes the secret's value as an environment variable named 'SONAR_TOKEN'
      # to all subsequent build steps. This allows the sonar-scanner step to use it directly.
      env: 'SONAR_TOKEN'
🚀 What’s Next?
We’ve now set up a secure, automated build pipeline on GCP with quality gates enforced through SonarQube. Our code is compiled, analyzed, and monitored for issues — before it ever reaches a container.
In the next post, we’ll take this a step further by scanning our Docker images with Trivy, checking for vulnerabilities in dependencies, base layers, and configurations.
Stay tuned for Part 4:Adding Container Scanning with Trivy on GCP